* or Similar tools with the option to define custom Webhooks.
While Zapier has a native connector to Marketo, the native connector is very limited in the scope of what it can do in Marketo. It's great for injecting leads into Marketo, and adding leads to a list - but that's about it. For anything else the only way to use Zapier with Marketo is to to send some of the commands via the API, directly from Zapier Webhooks.
In order to send API commands directly to Marketo from Zapier, you would need at least Two Webhooks steps - one for authentication, and the 2nd one to execute the command you wish to execute.
From my personal experience, it is always the authentication part that takes most time to figure up, especially for non-developers, due to lack of understanding of how HTTP Request Methods work and the different UI between common dev-tools (CURL), development languages and Zapier.
But worry not - I'm here!
In this series I'll show you how to authenticate your requests via Zapier to common Marketing and Sales tools. In the previous post I've showed how to authenticate with SFDC, in this post we'll authenticate with Marketo and post a Marketo custom activity via API.
Marketo
To connect the REST API we would need to do the following (via an Admin user):
- In Marketo, we will need a user with API permissions, and a service set for our connection:
1. If you don't have one set already - create an API only user role, with 'access api' permissions:

It is wise to only check the permissions you actually need to use. It's most likely you already use most of them and have an API role set already if you are not new to Marketo.
2. Create a user with the API role.
- Create a service via your created user (Admin -> Integration -> LaunchPoint)
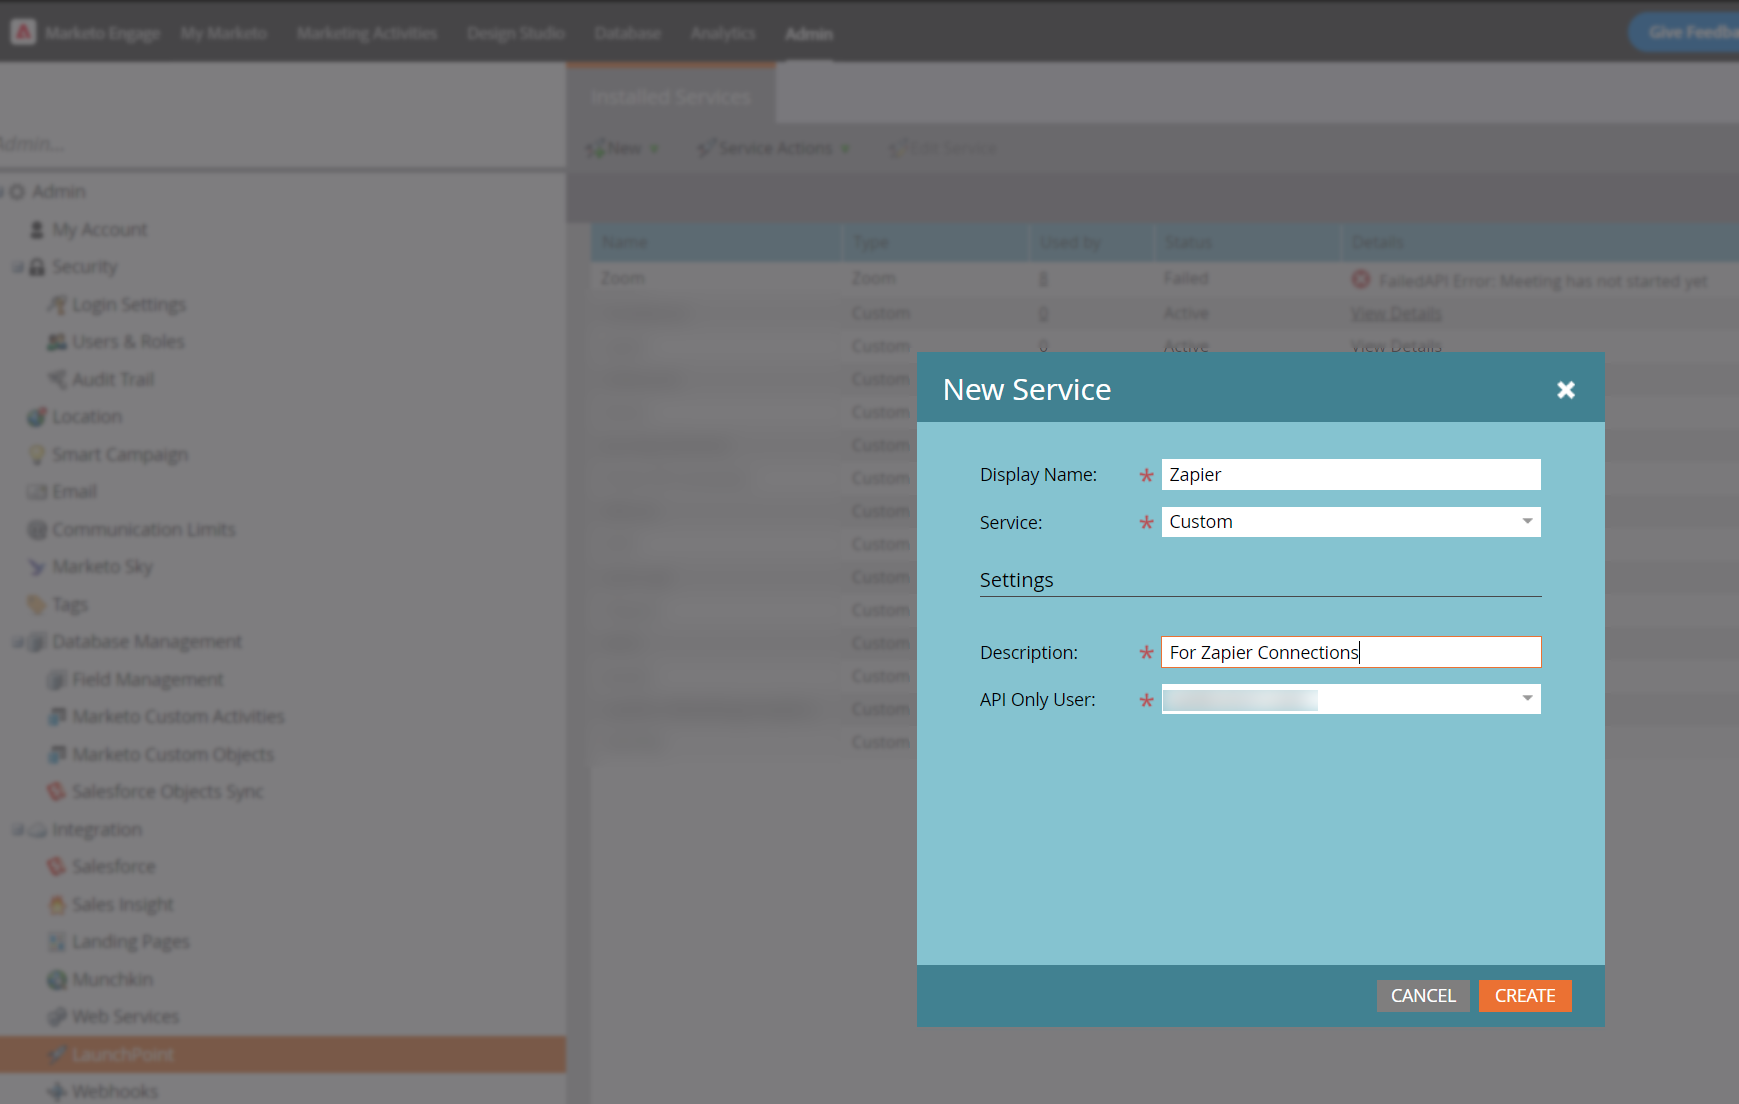
Give your service a unique name and use a unique API user, so it would be easier to identify API issues sources in the future.
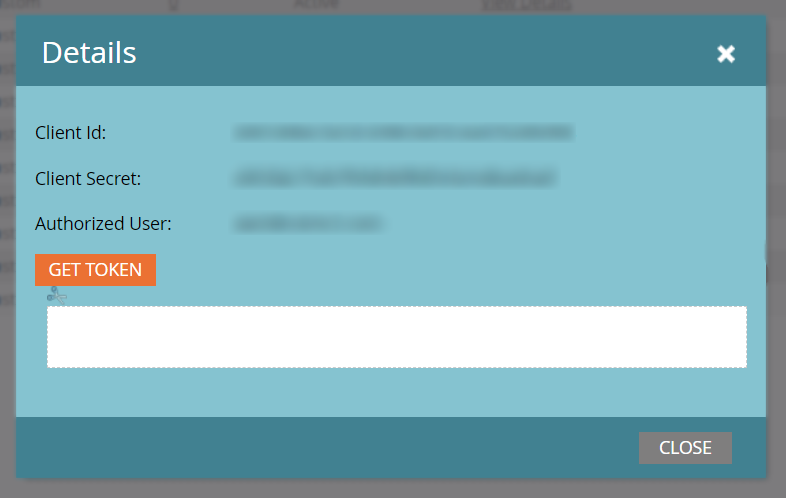
Now that you have created the service, click on view details and copy both the Client ID and Client Secret values - you'll need them to get an access token from Marketo.
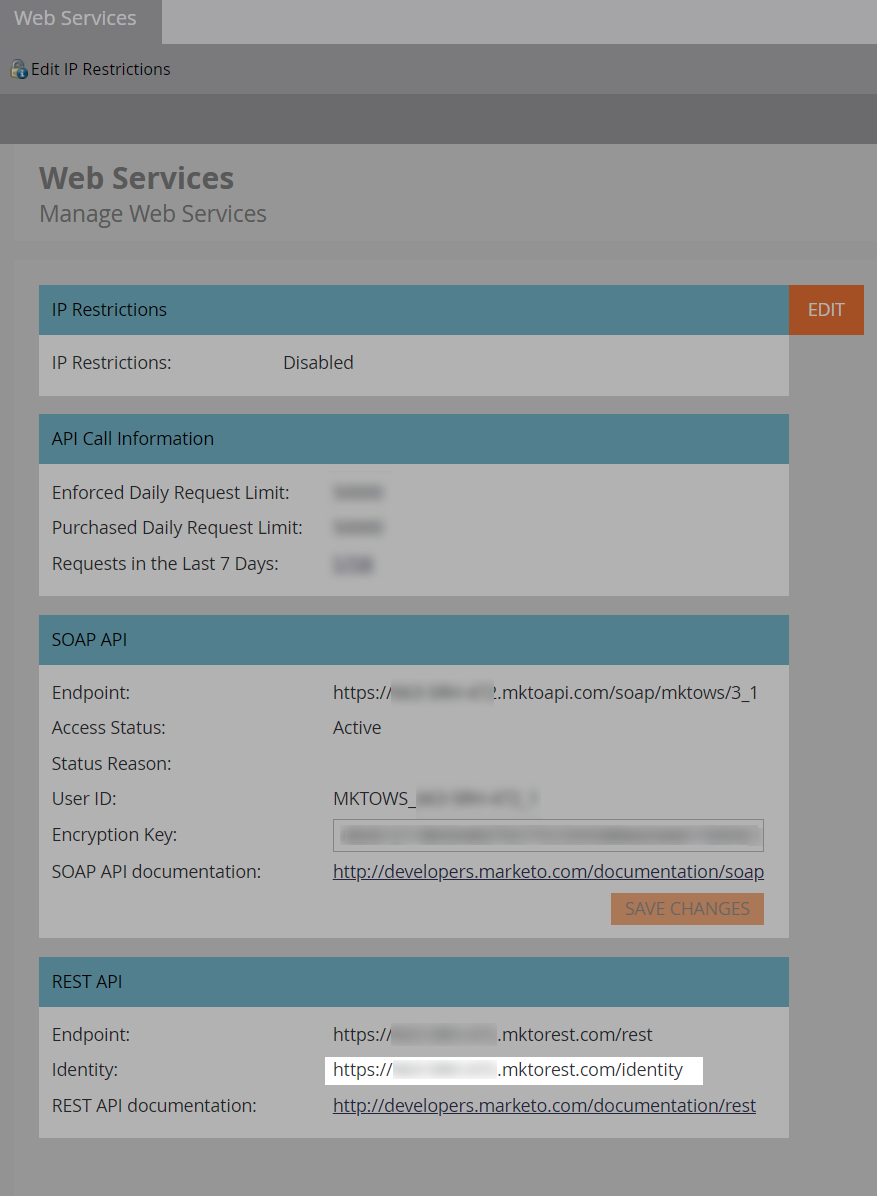
- From the web services tab, grab your REST API Identity endpoint URL (actually, just grab the URL without the /identity - we will need to use it both with '/identity' for authentication, and later with '/rest' for sending requests to Marketo)
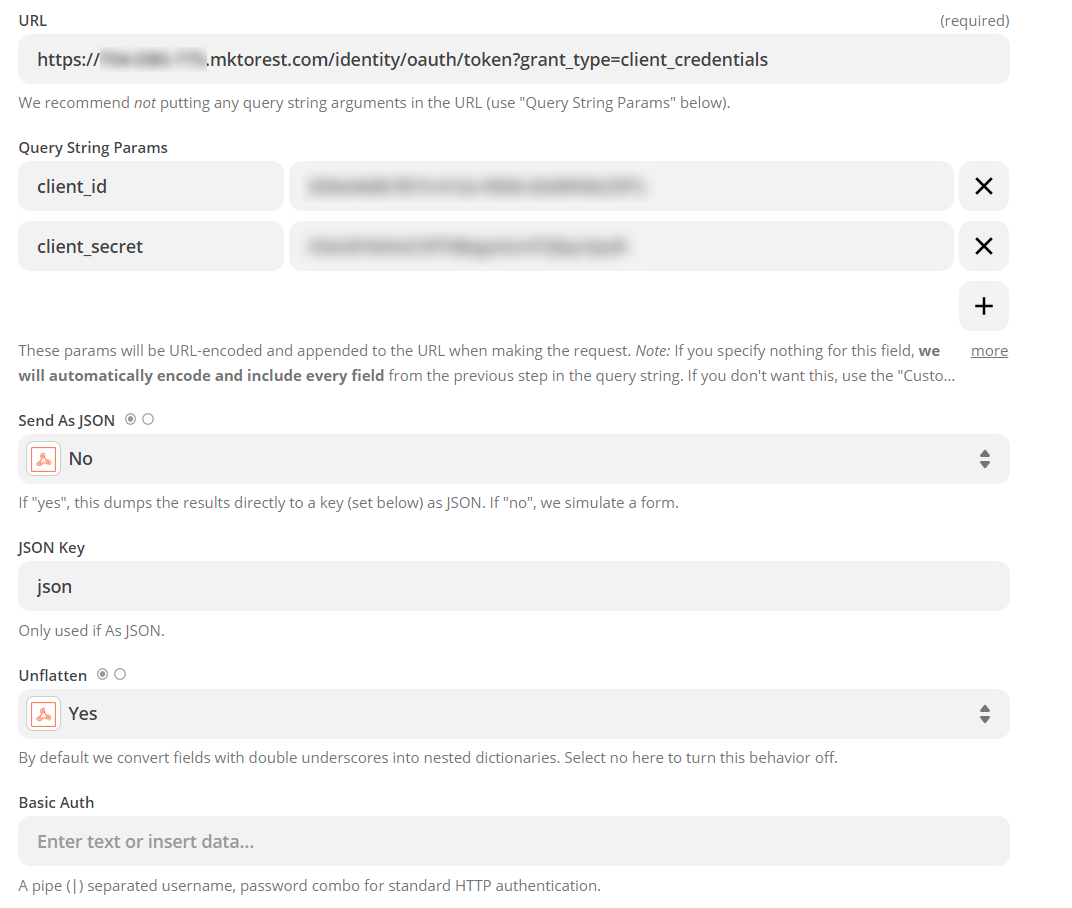
Cool, Now we have everything we need in order to generate an access token. Think of it as a temporary secret key that you send with each API request to Marketo - as it is temporary, you will generate this token at the first Zapier step - following steps will use it with the different API requests as the authentication mechanism.
- We should use a Zapier 'GET' Webhook to the identity URL we copied earlier, with the following structure:
{identity-url}/oauth/token?grant_type=client_credentials
In the Query String Params - we shall add two variables:
client_id (with the value we got from Marketo earlier)
client_secret (with the value we got from Marketo earlier)
It should look like this:
- The result of this request is our access token, alongside few details:
access_token: xxxxxxxxxxxxxxxxxxxxxxxxxxxx
token_type: bearer
expires_in: 3219
scope: xxxxxxxxx
* The access token - we shall use in the following steps
* The token_type - it's value will always be 'bearer', as it is the OAuth 2.0 authentication token used in services that use OAuth 2.0 (such as Marketo).
* The expires_in - it's value is the value in seconds before this token is invalid and needs a replacement. For our purpose (single API requests fired periodically from Zapier) we probably care less for it, but it's very important for actual development as ideally you would like to send as little requests to Marketo if possible - to make your backend more efficient. i.e. there is no need to send multiple requests to get an access-token before it expires.
* The scope - The API user email address. - That's It - we have the access token, now it's time to use it.
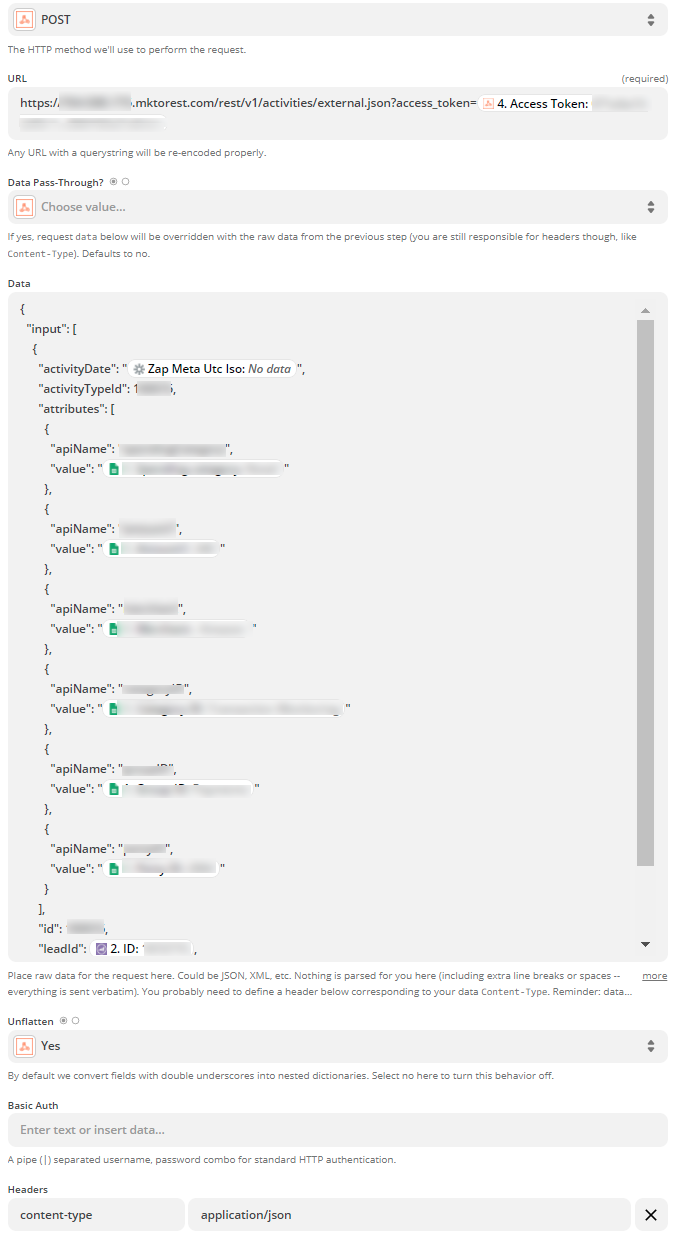
In the image below, I post a custom activity (already defined on Marketo side), with some data from a google spreadsheet I picked earlier. I use a Zapier Post webhook, aimed at the specific endpoint URL for posting activities:
{endpoint-url}/rest/v1/activities/external.json
I append to that URL the access token generated by the previous Zap by adding ?access_token={acces_token_value}
The values of the custom activity are being passed in JSON format - so we need to set a content-type header with the value application/json, and also note that I use the time-stamp generated by Zapier (as described here).
In this particular example I've also used the official Zapier connector to search for the lead ID of the email address I have in the spreadsheet - this can also be done via the API directly, of course.
So this is how you post a custom activity to a particular person in Marketo.
With this method you can do just about everything you wish to via Marketo REST API. Personally, I use it mostly to automated processes related to lead management, sending tokens to Marketo programs (RSS to Marketo emails, for example, is one use-case) and triggering smart-campaigns from external systems.
All of these use-cases will be explored here via future posts, with actual Zapier and Integromat described steps.